PIONEER DDJ-SX
INSTALLATION
Firmware & Drivers
Firmware: Firmware: Update the firmware of the unit to the latest version from Pioneer Dj
Drivers: Install the latest drivers from Pioneer Dj
(in case you have not done already)
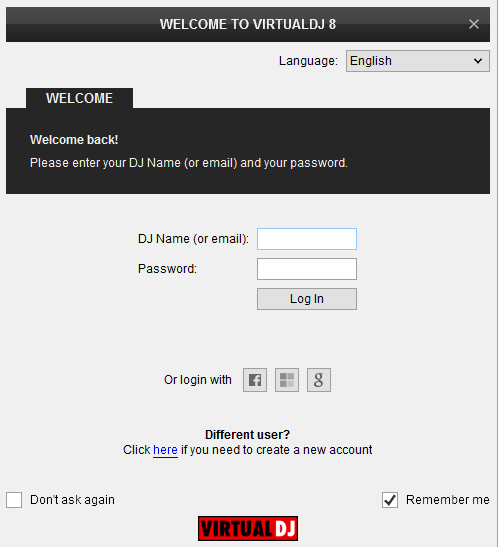
Once VirtualDJ 8 is launched, a Login Window will appear. Login with your virtualdj.com account credentials. A Pro Infinity or a Pro Subscription License is required to fully use the Pioneer DDJ-SX
Without any of the above Licenses, the controller will operate for 10 minutes each time you restart VirtualDJ.
Buy a license
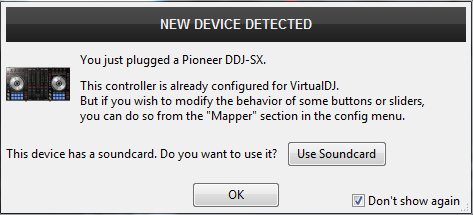
Click to OK.
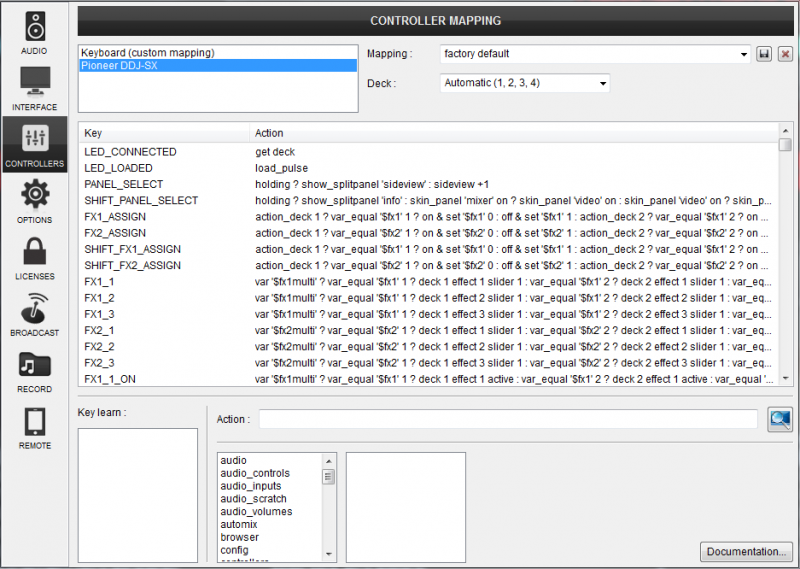
Advanced Setup
The unit should be visible in the CONTROLLERS tab of Config and the “factory default” available/selected from the Mappings drop-down list. The factory default Mapping offers the functions described in this Manual, however those can be adjusted to your needs via VDJ Script actions.
Find more details at
VDJ Pedia
AUDIO Setup
The unit has a pre-defined Audio setup and a special button in the AUDIO tab of Config to provide that. Alternative Audio setups can be applied in the same window
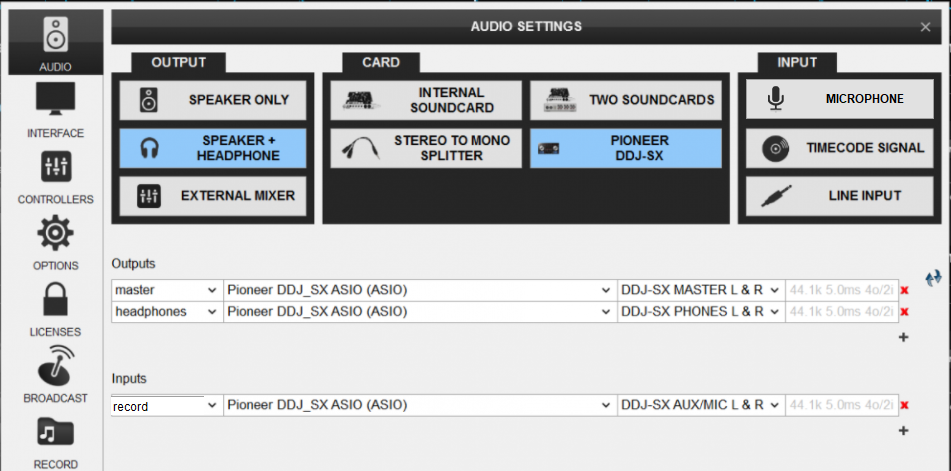
For further software settings please refer to the Manuals of VirtualDJ 8.
LAYOUT
S SHIFT: Hold this button down to access secondary functions of Pioneer DDJ-SX (mainly in white lettering)
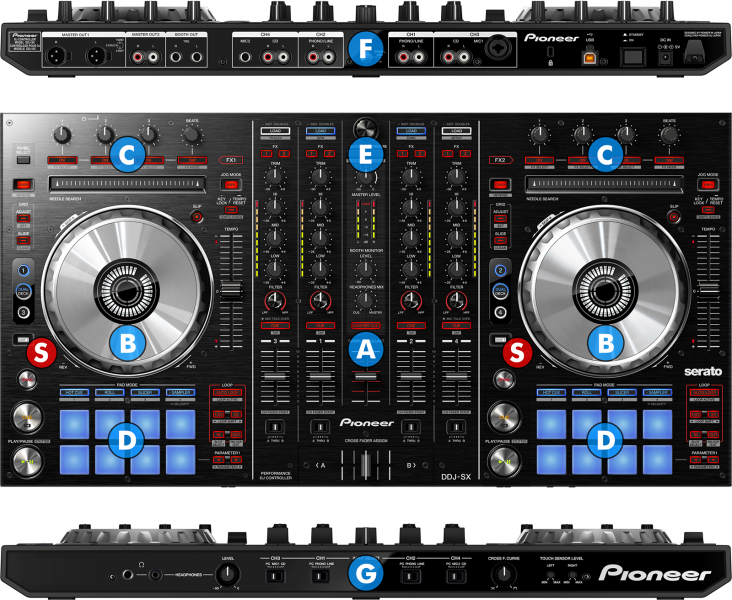
The functionality of each button, knob and slider per section (as shown in the image above) will be explained in detail in the next chapters
Mixer
- CROSSFADER: Blends audio between the left and right channels.
- CROSSFADER ASSIGN: Assign each deck on the left or right side of the crossfader, or alternatively bypass the crossfader entirely (thru)
- VOLUME: Alter the sound of each deck. While SHIFT is held down, the VOLUME faders will stop the deck at the previously selected Cue point when these reach the minimum level (zero - Fader Stop) and they will start the deck - synced to the other deck - if those are moved away from the zero position. (Fader Start)
- PFL: Press this button to send this channel's pre-fader signal to the Cue Channel for monitoring. When engaged, the button will be lit. Press SHIFT and then one of the PFL buttons to manually tap the tempo of the loaded track.
- FILTER: Applies a High Pass/Low Pass Filter on the track (middle position is Off position).
- EQ-LOW: Adjust the low (bass) frequencies of the corresponding deck.
- EQ-MID: Adjust the middle (mid) frequencies of the corresponding deck
- EQ-HI: Adjust the high (treble) frequencies of the corresponding deck
- TRIM: Adjusts the audio level (gain) of the corresponding deck. When the “GainSliderIncludesAutoGain” option inside VirtualDj’s configuration is set to yes (default) then the normal (park) position is 12 o clock.

- PFL VU METERS: Shows the strength of each channel’s pre fader signal.
- MASTER VOLUME. Adjust the level of the Master Output. Hardware operation, not visible on the VirtualDJ GUI.
- MASTER VOLUME VU-METERS: Shows strength of the master output signal.
- BOOTH MONITOR LEVEL: Adjust the level of the Booth Output. Hardware operation, not visible on the VirtualDJ GUI.
- HEADPHONES MIXING. Adjust how the Channels and the Master Output blend at the Headphones Channel. Hardware operation, but movement visible on the VirtualDJ GUI.
- MASTER PFL: Press this button to send the Master Output to the Headphones channel (Hardware operation)
- SAMPLER VOLUME: Adjusts the Master Volume of the Sampler
Deck Controls
- PLAY/PAUSE: Plays / Pauses the track. Press and hold SHIFT and then press this button to "stutter-play" the track from the last set Cue Point.
- CUE: When the Deck is paused, you can set a temporary Cue Point by moving the Platter to place the Audio Pointer at the desired location and then pressing the Cue Button. During playback, you can press the Cue Button to return the track to this Cue Point. (If you did not set a Cue Point, then it will return to the beginning of the track.). If the Deck is paused, you can press and hold the Cue Button to play the track from the Temporary Cue Point. Releasing the Cue Button will return the track to the temporary Cue Point and pause it. To continue playback without returning to the Temporary Cue Point, press and hold the Cue Button, then press and hold the Play Button, and then release both buttons.
Press and hold SHIFT and then press this button to return to the beginning of the track. - SYNC: Press this button to automatically match the corresponding Deck's tempo with the opposite Deck's (or the Master Deck’s if using a 4 decks Skin) tempo and phase. Press and hold SHIFT and press this button to set this deck as Master Deck (for 4 decks skins).
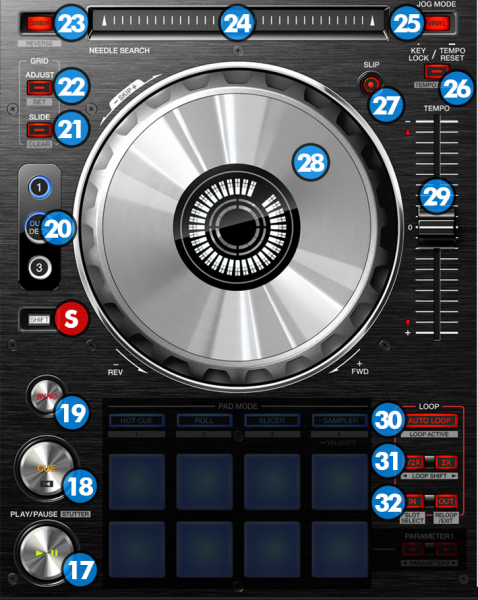
S SHIFT : Press and hold this button to access secondary functions (in white box) of other controls on the DDJ-SX. - DECK SELECT: Switch Left decks (1 and 3) and Right Decks (2 and 4).
- GRID SLIDE: Press and hold this button and then move the JOGWHEEL to shift the position of the CGB of the track. Hold down SHIFT and press this button to reanalyze the BPM of the track and thus clear any changes you may have made before.
- GRID ADJUST: Press and hold this button and then move the JOGWHEEL to adjust the width of the CGB of the track (equal to adjust the BPM of the track). Hold down SHIFT and press this button to set the current position of the track as the First Beat.
- CENSOR: Press and hold this button to play the track backwards. On release the track will continue from the position it would have been if the button was never pressed. If SHIFT is held down, press this button (momentarily) to play the track backwards. Press again to play forward.
- STRIP SEARCH: The length of this strip represents the length of the entire track. Place your finger on a point along this sensor to jump to that point in the track (song position). Please note that while a deck is playing “on air” the strip search will not function in order to prevent sudden accidental jumps that may occur if you touch the strip by accident while you operate other controls. If you want to jump on a new position while the track is “on air” please hold down SHIFT button first and then touch the strip to bypass security.
- JOG MODE: Press this button to toggle the JOGWHEEL between Scratch and Pitch Bend modes. When the led of the button is on the JOGWHEEL performs in Scratch mode
- KEYLOCK: Press this button to "lock" the track's pitch to its original key. The track's tempo will remain at the speed designated by the Pitch Fader. Press and hold the button for more than 1 second to smoothly reset the Pitch of the track to zero (original tempo). Hold SHIFT and then press this button to cycle through the available pitch range values.
- SLIP: Enables Slip Mode. Several software functions (such as Jogwheel movements, HotCues and Loops) will apply temporarily on the track, and the track will return to the position it would have been if those functions were not triggered.
- JOGWHEEL: Touch sensitive platter for scratching (vinyl mode), bending (CD Mode) or Grid adjustment. The white leds will rotate according to the software jogwheel position and they will also blink at the last 30 seconds of a track.
- PITCH: Controls the track's playback tempo. The Up and Down Arrow LEDs will turn on if the pitch position of the unit and the actual pitch of the software do not match. While one of these leds is turned on, the pitch slider of the DDJ-SX will not control the pitch of the deck until it meets the software value (soft take-over).
- AUTOLOOP: Sets an Auto Loop. Hold SHIFT and press the same button to activate a Saved Loop.
- HALF/DOUBLE: Halves/Doubles the size of the Loop. Hold SHIFT and press the 1/2X or 2X buttons to move the triggered loop forward or backwards (step is relative to the length of the loop).
- IN/OUT: Use these buttons to set a Loop In and a Loop Out point (for manual looping).
If a loop is active press the IN button to use the jog in order to fine tune the loop-in point. Press IN again to restore the jog back to its original operation. During the time that the jog can be used to adjust the loop-in point, the corresponding led will blink to notify you of the change.
If a loop is active press the OUT button to use the jog in order to fine tune the loop-out point. Press OUT again to restore the jog back to its original operation. During the time that the jog can be used to adjust the loop-out point, the corresponding led will blink to notify you of the change
EFFECTS
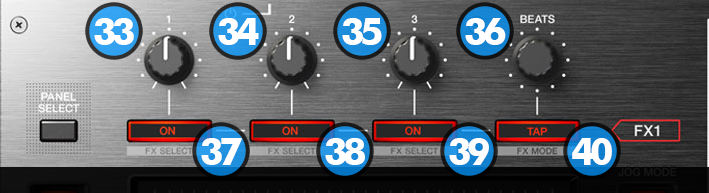
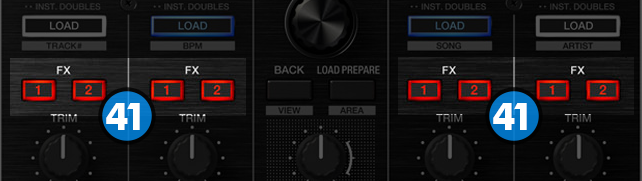
The Left FX section (FX1) controls by default the effects of the Left selected software deck (1 or 3) and the Right FX section (FX2) controls by default the effects of the Right selected software deck (2 or 4) respectively.
Use the FX ASSIGN (41) buttons to clone (copy) the effects from one to another.
Each one of the FX unit offers 2 modes:
The Single Effect mode offers one effect slot but more parameters controls per effect.
The Multi Effects mode offers 3 effect slots (to trigger more than 1 effect at the same time – chained effects).
The selection between those 2 modes is done by pressing the TAP while SHIFT is held.
Single Effect mode
Hold SHIFT down and then use the TAP button to select the Single FX mode in the default GUI. The Single FX mode is selected by default on first launch
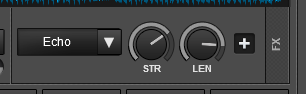
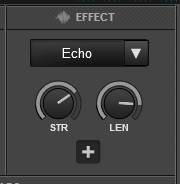
In this mode a single Effect is controlled with up to 6 Parameters and 3 Effect buttons. Only the first 2 Parameters are visible on the GUI. More Parameters and Effect buttons can be viewed in the FX GUI (opened from the + button on the GUI)
- FX1 knob. Controls the 1st effect parameter of the selected effect.
Hold SHIFT down to control the 4th effect parameter of the selected effect (if available). - FX2 knob. Controls the 2nd effect parameter of the selected effect.
Hold SHIFT down to control the 5th effect parameter of the selected effect (if available). - FX3 knob. Controls the 3rd effect parameter of the selected effect.
Hold SHIFT down to control the 6th effect parameter of the selected effect (if available).
- FX1 ON. Press this button to enable/disable the selected effect to the Left/Right selected deck.
Hold SHIFT down and then use this button, to enable/disable the 1st effect button of the selected effect (if available). - FX2 ON. Press this button to select the previous effect from VirtualDJ Effects list.
Hold SHIFT down and then use this button, to enable/disable the 2nd effect button of the selected effect (if available). - FX3 ON. Press this button to select the next effect from VirtualDJ Effects list.
Hold SHIFT down and then use this button, to enable/disable the 3rd effect button of the selected effect (if available).
Multi Effects mode
Hold SHIFT down and then use the TAP button to select the Multi FX mode in the default GUI.
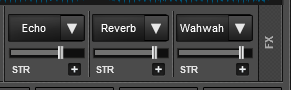

In this mode 3 different Effects can be applied and controlled with up to 2 Parameters for each FX slot. Only the first Parameter is visible on the GUI (and the 2nd Parameter while SHIFT is held down on the DDJ-SX2). More Parameters and Effect buttons can be viewed in the FX GUI (opened from the + button on the GUI)
- FX1 knob. Controls the 1st parameter of the selected effect of FX slot 1.
Hold SHIFT to control the 2nd parameter of the selected effect of FX slot 1. - FX2knob. Controls the 1st parameter of the selected effect of FX slot 2.
Hold SHIFT to control the 2nd parameter of the selected effect of FX slot 2 - FX3 knob. Controls the 1st parameter of the selected effect of FX slot 3.
Hold SHIFT to control the 2nd parameter of the selected effect of FX slot 3.
- FX1 ON. Press this button to enable/disable the selected effect of FX slot 1.
Hold SHIFT and press this button to select the next available effect for FX slot 1. - FX2 ON. Press this button to enable/disable the selected effect of FX slot 2.
Hold SHIFT and press this button to select the next available effect for FX slot 2. - FX3 ON. Press this button to enable/disable the selected effect of FX slot 3.
Hold SHIFT and press this button to select the next available effect for FX slot 3.
Beats & FX Clone
- BEATS. Turn this knob to adjust the Beats of a Beat-aware Effect. Push this knob down to select 4 beats as the beat length of a Beat-aware effect.
Currently only the Beats of the Echo effect can be adjusted using this knob. More Beat-aware Effects will be available in future versions.
Hold SHIFT and turn this knob to adjust the key of the song.
Hold SHIFT and press the knob down to reset the track to it's original key.
- TAP. Press this button to manually tap the tempo of the track. Press SHIFT and then this button to toggle between the Single and Multi Effect modes.
Starting from VirtualDJ 8.2, the selected Effects from one deck can be cloned (copied) to any other deck, using the FX ASSIGN buttons. - FX ASSIGN:
FX ASSIGN 1: Clone the selected Effects of Deck 1 to this deck
FX ASSIGN 2: Clone the selected Effects of Deck 2 to this deck
SHIFT + FX ASSIGN 1: Clone the selected Effects of Deck 3 to this deck
SHIFT + FX ASSIGN 2: Clone the selected Effects of Deck 4 to this deck
PADS
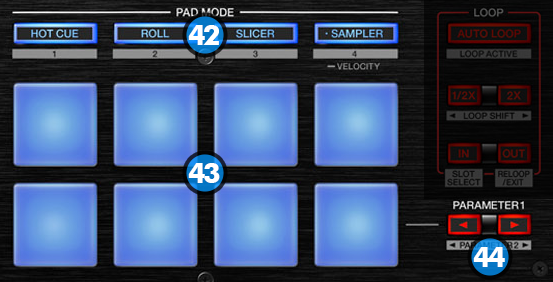 The 8 Pads offer various functions, depending on the selected Pad mode. Each of the 4 Pad mode buttons offers 2 individual modes (hold SHIFT and then press the PAD MODE button to access the additional mode). The modes represent a page of the PADS section on the default VirtualDJ GUI.
- PAD MODE: Press any of the 4 available Pad mode buttons to set the Pads to Hotcues, Loop Roll, Slicer or Sampler mode.
Hold SHIFT and then press any of the 4 available Pad mode buttons to set the Pads to CueLoop, Saved Loop, Slicer Loop and Sampler Velocity mode. All 8 available Pad modes are explained in details in the next chapters - PADS: The 8 Pads offer different functionality depending on the selected mode. See next chapters for further details.
- PARAMETER: These buttons control the Parameters of the selected Pad mode.
Browser Control
- BROWSE:
Rotate: Scrolls through files or folders. When SHIFT is pressed it switches focus on folders and navigates them.
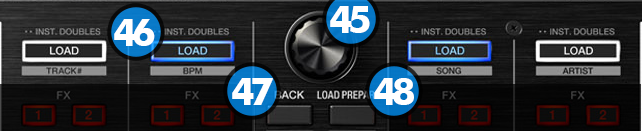
Push: If focus is on Songs list or Sideview, it loads the track to the default player. If focus is on the Folders list it switches focus on the Songs List. When SHIFT is pressed, it set focus to the Folders list or opens/closes subfolders if focus is on the folders list. - LOAD: Press one of these buttons while a track is selected to load it on the corresponding deck. Press and hold the same button for more than 1 second, to unload the same deck.
Press SHIFT and the LOAD buttons to sort the tracks of the Songs list by Smart mode, BPM, Title or Artist in descending or ascending order. - BACK: Sets focus to the Folders list or opens/closes subfolders if focus is already on the folders list. When SHIFT is pressed it cycles focus between Folders, Songs and the Sideview.
- LOAD PREPARE: Adds the selected track to the Automix list of SideView. When SHIFT is pressed, it cycles through the available view of Sideview (Automix, Sidelist, Sampler, Karaoke, Clone views).
Rear Side

- MASTER OUT1: Master signal output connectors (XLR – Balanced). Use this to connect on your pro grade amplifier or self-powered speakers.
- MASTER OUT2: Master signal output connectors (RCA – Unbalanced). Use it to connect with another mixer, or consumer grade amplifier.
- BOOTH OUT: Booth signal output (TRS – Balanced). The strength of the signal is controlled by “BOOTH MONITOR LEVEL” knob (13) on the mixer section. Use it to connect your booth speakers, or an amp that needs different sound output level than master output.
- CH4 INPUTS *: Connect an analog source on CH4 of the DDJ-SX mixer. You can connect a MIC (jack input) or a CD-Player. The input is selectable via “INPUT SELECT SWITCH” (62) on the front side.
- CH2 INPUT *: Connect an analog source on CH2 of DDJ-SX Mixer. You can connect a turntable or a CD-Player. The input is selectable via “INPUT SELECT SWITCH” (62) on the front side.
- GND SCREW: Use it to screw your GND cable from turntables that provide it in order to eliminate GND static noise.
- CH1 INPUT *: Connect an analog source on CH1 of DDJ-SX Mixer. You can connect a turntable or a CD-Player. The input is selectable via “INPUT SELECT SWITCH” (62) on the front side.
- CH3 INPUTS *: Connect an analog source on CH3 of the DDJ-SX mixer. You can connect a MIC (XLR/Jack combo input) or a CD-Player. The input is selectable via “INPUT SELECT SWITCH” (62) on the front side.
- USB CONNECTOR: Use a standard USB cable to connect DDJ-SX with your computer.
- POWER SWITCH: Turns on/off the power on the device.
- POWER INPUT: Connect the supplied power supply unit.
* Note : None of the CH1, CH2, CH3 or CH4 Inputs are part of the USB Audio interface of the DDJ-SX, thus these cannot be included in the Audio Setup of VirtualDJ. The single Input of the DDJ-SX Audio Interface (named as AUX/MIC) is used to record your mix along with any of the AUX/MIC Inputs.
Front Side

- HEADPHONES CONNECTOR: Use one of the two jacks to connect your headphones.
- HEADPHONES LEVEL: Adjusts the Headphones (CUE) Output Volume (Hardware operation, not visible on the VirtualDJ GUI).
- INPUT SELECT SWITCH: Selects the input of the corresponding channel of DDJ-SX mixer. For VirtualDJ to operate the decks, you need to set these on “PC” position.
- CROSSFADER CURVE: Adjusts the curve of the crossfader.
- JOGS TOUCH SENSITIVITY ADJUST: Use these two knobs to adjust the sensitivity of the touch sensor of SX JOGS.